-
-
Notifications
You must be signed in to change notification settings - Fork 559
Hardware overview
Mark Thompson edited this page Apr 13, 2024
·
19 revisions


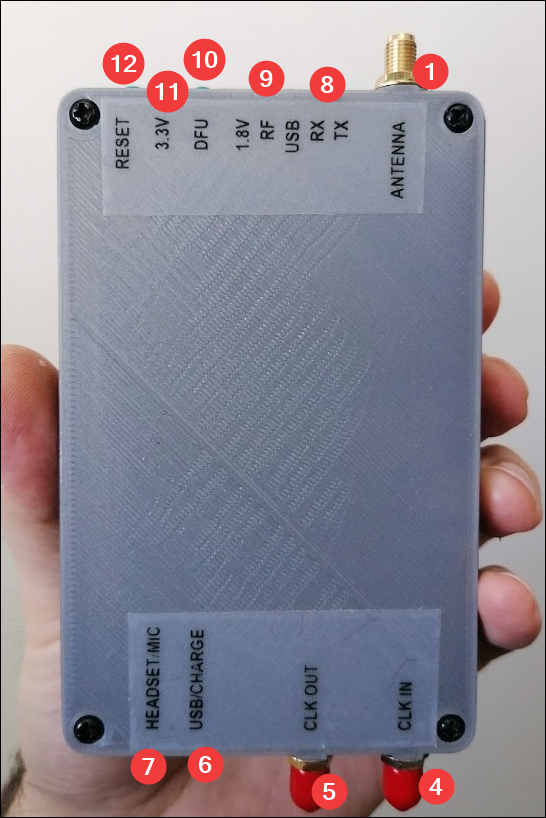
- Antenna (the connector is a female SMA, so the antenna needs to be male SMA, and not RPSMA)
- Encoder thumb wheel (on the H1 has a different layout, but the same functionality). Pushing the wheel down once to turn ON, or twice quickly to turn OFF.
- Directional pushbuttons and Enter/Select in the center
- CLK IN
- CLK OUT
- Micro usb port and next to it, charging led indicator (in the H2, this might flicker while charging but will mostly turn off when the battery is full)
- Headset/Microphone (standard smartphone 4 segment 3.5mm connector)
- Receive and transmit leds (indicates the current operation, since the HackRF is half-duplex, only one of this will be lit at every moment)
- Other status leds (1.8V: rail status, RF: internal power supply, USB: connection to host is active)
Note: In normal operation, 3.3V, 1.8V, RF lights will be ON.
- DFU mode button (check the firmware update procedure for details)
- 3.3V rail status led
- Reset button
Check care of PortaPack/HackRF for general guidelines of how to take care of your device.

- MicroSD card slot (insert the card with the contacts looking to the same direction as the screen)
- GPS module option (has not been implemented)
- Memory backup coin cell (compatible with CR1225 or CR1220 in the H2, and with the CR2032 or CR2025 in the H1)
- Speaker connector (yellow and red go to the speaker coil, black is ground and can be left disconnected)
- Battery connector
- TCXO clock (it might be populated with SMD components like in the upper image, unpopulated or populated with a shielded module)
- Headset/Microphone jack (In case of the H2 the internal speaker switches automatically when the headset is plugged)
- USB charging circuitry (only the units with battery; this is a standard power bank chipset)
- Audio amp circuitry
Tip
Adding a small bead of hot-glue on the top of the SD card slot, as shown here, will prevent the SD card from falling down inside the case when it's being inserted.

Note
The wiki is incomplete. Please add content and collaborate.
Important
- This is a public wiki. Everything is visible to everyone. Don't use it for personal notes.
- Avoid linking to external tutorials/articles; they may become outdated or contain false information.
How to collaborate
How to ask questions correctly
- First steps
- Usage cautions
- Intended use and Legality
- Features
- PortaPack Versions (which one to buy)
- HackRF Versions
- Firmware update procedure
- Description of the hardware
- User interface
- Powering the PortaPack
- Troubleshooting
- Applications
-
Compilation of the firmware
- Compile on WSL with ninja
- How to compile on Windows faster with WSL 2
- Using Docker and Kitematic
- Docker command-line reference
- Using Buddyworks and other CI platforms
- Notes for Buddy.Works (and other CI platforms)
- Using ARM on Debian host
- All in one script for ARM on Debian host
- Compile on Arch based distro (exclude Asahi)
- Dev build versions
- Notes About ccache
- Create a custom map
- Code formatting
- PR process
- Description of the Structure
- Software Dev Guides
- Tools
- Research
- UI Screenshots
- Maintaining
- Creating a prod/stable release (Maintainers only)
- Maintaining rules
- Development States Notes